Monday, December 26, 2016

Bacon cheddar cookies (low carb, gluten free)

  • Pin It

What kind of cookies do you make for people who don't eat sugar, prefer to avoid artificial sweeteners, follow a low carb diet, and generally aren't too fond of dessert? (Like, um, ME.)

I make Bacon Cheddar Cookies. Or "cookies," if you prefer. They're bite-sized, crumbly, full of umami, and completely addictive. With only five ingredients, these little nuggets are the perfect cookie-like treat for those who prefer savory to sweet.

Serve these Bacon Cheddar Cookies with a glass of wine, champagne or Prosecco. You can use fancy cheese (my favorites are made by Cabot and Kerrygold) or buy pre-shredded cheddar cheese at the grocery store. Either way, these Bacon Cheddar Cookies will be a huge hit.

Note: For the cookies in the photos above, I used pre-shredded mild cheddar cheese, and the anti-caking agent in the pre-shredded cheese keeps the cookies from spreading. If you use a higher fat cheese that you shred yourself, your cookies will spread more and get brown, crisp and crumbly around the edges. Don't worry: They will still be delicious, even if they don't hold together quite as well.


Bacon Cheddar Cookies

Makes about 36 2-inch cookies

Ingredients


  • 1/2 cup butter (1 stick), softened
  • 2 cups shredded cheddar cheese
  • 2 cups almond flour (fine is better than coarse)
  • 6 pieces bacon, cooked, cooled and crumbled
  • 1/8 teaspoon freshly ground black pepper

Instructions


  1. Heat the oven to 350 degrees F. Line three sheet pans with parchment paper.
  2. Put all the ingredients into the bowl of a stand mixer with the paddle attachment. Blend on medium speed until everything is blended well and a stiff dough forms, about 1 minute. (If you prefer to mix by hand or with a hand-held mixer, that's fine; just make sure you mix it aggressively enough to get a cohesive dough.)
  3. Using a generous teaspoon of dough for each cookie, roll the dough into small balls. Place the balls on the prepared sheet pans, pressing them down slightly.
  4. Bake the cookies about 15 minutes, until the edges are starting to turn golden brown. Remove from the oven and cool on the baking sheet or on a rack.


Gluten free | Diabetic friendly | Low carb | Grain free | Sugar free

Friday, November 4, 2016

My health transformation story in DR. OZ THE GOOD LIFE

  • Pin It


The editors added the phrase "kick diabetes to the curb" and I've adopted it. Because that's exactly what I'm doing: giving diabetes a huge boot in the rear end and keeping it Out. Of. My. Life.

Enjoy the article. I think they did a great job. I've told the writer, Lambeth Hochwald, that she managed to capture my story exactly the way I would have written it myself. Which is the biggest compliment one writer can give another.

Read it online: 'I Ate My Way to Healthy:' Erika's Weight-Loss Success Story

Saturday, October 15, 2016

Big changes at Not Ketchup, my condiment business

  • Pin It
Erika Kerekes of Not Ketchup

Click here to support my crowdfunding campaign on PieShell - keep reading for details...


Many of you know that I am not great at asking for help. But today, I'm asking.

Not Ketchup, my line of all-natural sauces, is about to undergo a huge change.

By the end of the year, all five flavors of Not Ketchup will be made with zero added sugar.

And every new product I create going forward will be made the same way: sweetened with fruit and nothing else. No added sugar, no artificial or non-nutritive sweeteners. Sweetened by nature.

Why am I taking my business in this direction? It's simple: My health changed, so my life changed. And now my business is changing.

Which is why I need your help.

Diabetes: My wake-up call


In August 2015, shortly after the family photo above was taken, I was diagnosed with type 2 diabetes. I had been ignoring the warning signs for years, so when the actual call came from my doctor, I wasn't surprised.

But I was angry with myself. And determined to do something about it.

After only a few months of eliminating added sugar, careful low-carb eating and regular exercise, my blood sugar numbers were normal again. My diabetes is controlled, but it's never going to be gone. I'm going to have to eat mindfully for the rest of my life.

So long, sugar


I realized quickly that I am not the only person trying to cut down on or eliminate added sugar. While many people (including me) love my original Not Ketchup sauces, they do contain added sugar. And it's time for that to change.

Two of my Not Ketchup sauces are already made without added sugar (Tangerine Hatch Chile and Cherry Chipotle), and they are by far my most popular products on Amazon. Over the next few months I'll be adjusting the recipes for the rest of my Not Ketchup sauces, making test batches, redesigning and reprinting labels, and producing my first cases of the new *no added sugar* Smoky Date, Blueberry White Pepper and Spiced Fig Not Ketchup sauces. Everyone who's tasted the new recipes says they're even better than the originals, and I agree. I'm also working on additional flavors made without added sugar that I know you're going to love.

Please support my campaign


I'm running a crowdfunding campaign on PieShell to help me take Not Ketchup in this new, healthier direction, and I'm asking for your support. Any contribution helps, even if it's only $1. Rewards start at $30 and will be shipped in time for holiday gifting - wouldn't it be great to give your health-conscious friends and family delicious, unique, Paleo-friendly Not Ketchup sauces made without any added sugar?

And to those of you who have already contributed, thank you. Your support means the world to me.

Click here to help me bring my new, healthier Not Ketchup sauces to kitchens around America.


Thursday, October 13, 2016

Cream of mushroom soup

  • Pin It

The key to good cream of mushroom soup is a really good blender

There are three secrets to an aromatic, smooth, ultra-delicious cream of mushroom soup:

  1. High-quality chicken stock, homemade if possible
  2. Butter
  3. A high-powered blender
We eat a lot of mushroom soup, especially now that I am following a low-carb, high fat diet to control my diabetes. And yes, I am in love with an appliance. Why are you smirking? A kitchen appliance. Get your mind out of the gutter.

My Vitamix blender is my sweetheart, my crush, the apple of my eye.

An immersion blender is handy when you're making soup because you can puree it right in the pot. But it never gets totally smooth. I've made this cream of mushroom soup many times with an immersion blender, and while it tastes fabulous, it's always got a little texture to it. But the Vitamix produces cream of mushroom soup as smooth as milk. The cream I added just gilded the lily.

I'm a convert. The Vitamix is expensive (I bought it at Costco for about $400) but I think it's worth it. There's a lot of soup in my future.

Note: No one paid me anything or gave me anything to write this post. I bought my Vitamix with my own hard-earned money. And I intend to keep it for a good, long time. The link included in this post is an Amazon affiliate links, so if you click and buy anything, I will get a (very small) commission.


print recipe

Cream of mushroom soup
The better your blender, the smoother your soup will be. Flavorful Baby Bella mushrooms (also known as crimini mushrooms) add more personality than standard white button mushrooms, but use any mushrooms you like.
Ingredients
  • 2 Tbsp butter
  • 2 Tbsp olive oil
  • 1 large yellow onion, chopped
  • 1 pound Baby Bella (crimini) mushrooms, cleaned and roughly chopped (use the stems too!)
  • 1 quart chicken stock
  • 1/4 cup heavy cream
  • salt and pepper to taste
  • juice of 1/2 lemon
Instructions
Add the butter and oil to a large pot over medium-high heat. When the butter melts, add the chopped onion and saute about 4 minutes, until the onion is softened. Add the mushrooms and chicken stock. Bring the soup to a boil, turn down the heat, and simmer gently about 30 minutes, until all the vegetables are soft.Transfer the soup to your blender, working in batches if your blender isn't big enough to hold the whole pot. Puree the soup in the blender until very smooth, 1-2 minutes depending on the manliness of your appliance. (Alternatively, puree the soup in the pot with a hand-held immersion blender.)Return the soup to the pot, add the cream, and stir just until steaming. Season with salt, pepper and lemon juice. Serve immediately.
Details
Prep time: Cook time: Total time: Yield: 8-10 servings

Sunday, September 18, 2016

Cheeseburger stuffed mushrooms recipe {low carb}

  • Pin It

When I started eating a low-carb diet, my family's diet changed too.

My (healthy) husband and two (healthy) teenage boys do not and should not have to eat as carefully as I do. They don't have the health problems that prompted me to make these changes.

But I am my family's primary grocery shopper, meal preparer, refrigerator stocker and lunchbox packer.

I also have a full-time job and a side business to run (my Not Ketchup sauces).

All of which means I am not very interested in making two sets of meals - one for me and one for the rest of the family.

My protein-loving family loves most of the low-carb foods I have been enjoying. These Cheeseburger Stuffed Mushrooms disappeared quickly. I glazed some of them with my new *No Sugar Added* Cherry Chipotle Not Ketchup, and that was also a big hit.

I love these Cheeseburger Stuffed Mushrooms because they're easy, fast, low-carb, and FUN. Dinner tastes so much better when you can eat it with your fingers, don't you think? These would also be a great low-carb appetizer for a cocktail party.

Cheeseburger Stuffed Mushrooms


Ingredients


  • 12 large mushrooms (I used crimini mushrooms)
  • 1 Tablespoon olive oil
  • 1/2 pound ground beef
  • 1/2 onion, minced
  • 2 cloves garlic, minced
  • 1/2 teaspoon salt
  • Freshly ground pepper
  • 1/2 cup shredded or finely chopped cheese (I used sharp cheddar)
  • Optional: 1/2 cup *No Sugar Added* Cherry Chipotle Not Ketchup sauce


Instructions


  1. Heat the oven to 400 degrees F. Line a baking sheet with foil or parchment paper.
  2. Wash the mushrooms and carefully pop out the stems. Brush each mushroom with olive oil and lay it on the baking sheet.
  3. Put the mushrooms in the oven for about 10 minutes. The idea is to cook them partially before stuffing them to concentrate the mushroom flavor a bit and get out some of the liquid.
  4. While the mushrooms are cooking, mix together the ground beef, onion, garlic, salt, pepper and cheese in a bowl. Roll the beef mixture gently into 12 balls.
  5. Remove the mushrooms from the oven, then put one beef ball inside each mushroom. Press down gently and smooth the beef mixture so it fills the entire hole and extends all the way to the edges of the mushrooms. If using the Not Ketchup, brush about a teaspoon on top of each stuffed mushroom. 
  6. Return the now-stuffed mushrooms to the oven for 25-30 minutes, until the beef is cooked through. Serve immediately with more Not Ketchup for dipping.

Preparation time: 45 minutes | 6 servings

Saturday, September 10, 2016

Conquering diabetes: Talking to myself

  • Pin It


One of the tools I have used as I attacked my diabetes and made some long-overdue lifestyle changes over the past year has been talking to myself, or what I like to call "the script in my head." Sort of like Stuart Smalley and his "Daily Affirmations" from Saturday Night Live.

When you're trying to break bad habits, every day is a series of decision points. And at every point, you have a choice: You can make a good decision that moves you closer to your goals, or a worse decision that doesn't.

During the first few months of trying to break my bad habits and kick my diabetes to the curb, I found it helpful to have a prepared "script" in my head as I met each decision point. 

Actors have scripts that (mostly) have beginnings, middles and ends. They know where the story is going. They know how they're supposed to react when other actors say their lines or do something. They rehearse their lines so that when they speak them on camera it sounds natural. 

So I figured if I had lines, a script, that I could go back to and practice, eventually that script would feel natural. The words, but more important the feelings and actions, would start to come naturally.

Here are some of my internal conversations:

When I look in the mirror and get frustrated with my size and shape

  • It took a long time for your body to get this way. It's changing because you're making good decisions and taking care of yourself. It won't be perfect overnight, or maybe ever. That's okay.
  • If your diabetes is under control and your health is getting better, it doesn't matter what your stomach looks like.
  • Grandma Rose always had a belly, and she was the most beautiful woman in the world. (A fact.)
My Grandma Rose and me, c. 1989. Isn't she gorgeous?

When someone offers me food that doesn't fit my current eating preferences

  • Just because they're asking doesn't mean you need to say yes.
  • Is that food going to make you healthier or sicker?
  • Are you actually hungry? Physically hungry?
  • You don't have to eat that to know what it tastes like.
  • You don't have to eat that just because everyone else is eating it.

When I have a craving for food that doesn't fit my current eating preferences

  • Don't think about how it looks or smells. Think about how it will make you feel.
  • You think you want it, but is it going to make you healthier or sicker?
  • Will taking one bite make you want more or will it be enough to satisfy you? Be honest now.
  • What can you eat that will hit the same flavor notes but fits within your current preferences? (That's how I created my low-carb eggplant parmesan casserole - I was craving pizza.)

When I don't feel like exercising

  • Would you rather get on the elliptical / go for a walk / ride your bike or take another pill?
  • You'll feel better five minutes after you start.
  • Exercise is a non-negotiable part of your day.
  • Put on your exercise clothes and sneakers, then decide. (Once I'm dressed, I figure I might as well.)
  • Exercising will lower your blood pressure and blood sugar instantly. Skipping it is stupid.

Notice that none of these scripts is about losing weight. Not one. For me, this journey toward better health has not been about losing weight. It's about getting healthy, and that's it. After a few months I realized that I wasn't hearing these voices in my head as often because I needed them less. 

Have you ever tried to change your habits by talking to yourself? How did it work for you?

Saturday, September 3, 2016

Roasted Hatch chile mayonnaise

  • Pin It

It's Hatch chile season again, and food lovers in my neighborhood are going nuts. The long, tapered green chiles from New Mexico have a cult following here in southern California. I can get both the hot and mild varieties at just about every grocery store within a 10-mile radius.

Many stores have chile-roasting events in their parking lots so you can take home bags of freshly roasted chiles instead of having to roast them at home. Personally, I don't mind roasting them at home.

I wash the Hatch chiles, turn the burners on my gas stove to high, and lay the peppers directly on the iron grates of my stove. I turn them until they're blackened on all sides, then pop them into a zip-top bag to steam. The charred skin slips off easily and I'm left with strips of fragrant roasted chiles to use in sandwiches, quesadillas, casseroles, and condiments like this Hatch Chile Mayonnaise.

I've already made several quarts of this roasted Hatch Chile Mayonnaise since Hatch chiles showed up in local stores a few weeks ago. My husband and sons love it on a roast beef sandwich. Or you could:
  • Spread it on a sandwich with roast turkey, thinly sliced Granny Smith apples, shaved red onions and watercress
  • Spoon it on a burger (put some diced roasted Hatch chiles in the burger itself, too)
  • Serve it with broccoli fritters, zucchini fritters or spinach pancakes
  • Use it as a sauce for oven-roasted salmon fillets or chicken
  • Mix it with chopped hard-boiled eggs for the best egg salad of your life
Enjoy!

print recipe

Hatch Chile Mayonnaise
A simple condiment made with roasted fresh Hatch chiles from New Mexico
Ingredients
  • 6 Hatch chiles (hot or mild)
  • 1 1/2 cups mayonnaise
  • 1 Tablespoon lime juice
Instructions
Wash the Hatch chiles. Roast them over an open flame on a gas stove (I lay mine directly on the burner grate), turning frequently, until the skin is black and charred on all sides. (If you don't have a gas stove, broil the peppers in the oven, turning frequently.)Put the charred Hatch chiles in a zip-top bag for 30 minutes. They will steam as they cool.Slip the charred black skin off the chiles. If you want your Hatch Chile Mayonnaise very mild, remove the seeds and ribs from inside the peppers. Put the roasted Hatch chiles, mayonnaise and lime juice into a food processor. Process until smooth.Store in a clean jar with a tight-fitting lid in the refrigerator up to 2 weeks.
Details
Prep time: Cook time: Total time: Yield: 2 cups

Tuesday, August 16, 2016

Hatch chile chicken salad

  • Pin It

When Hatch chiles are in season, I turn into a crazy girl who stalks her local produce guy and pounces on every case he sets out. Thank goodness Melissa's Produce keeps Bob's Market, the family-owned market in my neighborhood, fully stocked with both mild and hot Hatch chiles when they're available.

Every year I roast dozens of Hatch chiles over an open flame right on my stove, slip off the charred skins, and freeze them in zip-top bags. (See How to Roast Hatch Chiles on Shockingly Delicious for detailed instructions.)

Hatch chiles have a unique flavor and meaty texture that's long been prized in New Mexico where they're grown. They can be hot or mild, but even the mild ones have a little kick. In fact, I love Hatch chiles so much that I created a new flavor of Not Ketchup around them - and now Tangerine Hatch Chile Not Ketchup is my best-selling sauce!

When I puree roasted Hatch chiles with mayonnaise and make chicken salad, my family weeps with joy. Okay, maybe they weep because it's spicy, but whatever. They really like it. And you will too.

print recipe

Hatch chile chicken salad
Roasted Hatch chiles add a welcome zing to this spicy chicken salad.
Ingredients
  • 1 cup mayonnaise
  • 4 mild or hot Hatch chiles, roasted, peeled, and seeded
  • 1 lime, juice only
  • 1 clove garlic
  • 1 store-bought rotisserie chicken
  • 1 bunch green onions, chopped
  • salt and freshly ground pepper to taste
Instructions
Puree the mayonnaise, Hatch chiles, lime juice, and garlic in a blender or food processor until smooth.Pull the chicken meat off the bones, shredding it with your fingers. Discard the bones and skin (or save them to make chicken stock). Put the chicken meat in a large bowl with the green onions. Spoon the Hatch chile mayonnaise into the bowl and stir to combine. Add salt and freshly ground pepper to taste.Serve chilled. If you have time to let the chicken salad sit in the refrigerator for a few hours before serving, great - the flavors will mingle and intensify.
Details
Prep time: Cook time: Total time: Yield: 4-6 servings

Monday, August 8, 2016

Conquering diabetes: This is not about losing weight

  • Pin It
Erika Kerekes hiking in the Santa Monica mountains - not to lose weight, but because exercise makes me healthier
I go hiking because I love it and it's making me healthier - not to lose weight

Previous post | Series index

I have spent the past year changing my life to battle my diabetes and improve my health.

I've changed the way I eat. I've made a commitment to daily exercise.

But most important, I've changed the way I think about food, exercise and my health.

When I decided last year to make these changes, I set a goal.

Unlike all the health-related goals I had set in the past, this goal was not about losing weight. This one had nothing to do with a number on a scale.

What do I really want?


That day in August 2015 when my doctor called to tell me that I had diabetes, I thought about what I really wanted for the rest of my life, however long that is.

I realized I want two things.

I want to be healthy. And I want to be happy.

Everything else matters less.

I hate dieting. And dieting doesn't work for me.


I know I'm not the only one who hates the word "diet."

Here's what goes through my brain when I think about dieting:

Deprivation. Longing. Missing out. Spartan. Measuring. Boring. Strict. Rigid. Proscribed. Negative. Irritable. Temporary.

Temporary.

If I want to stay healthy for the rest of my life, my new way of eating can't be temporary. It has to be permanent.

No wonder dieting never worked for me in the past.

Pan-seared wild salmon with pesto and blistered cherry tomatoes
I don't use the word "diet" anymore. Food can make me sick, or it can make me healthy.

Retraining my brain


Every change I have made this year has been about getting healthier, not about losing weight.

A year ago, when I was trying to figure out what and how to eat, I decided I would look at food and ask one question:

Is this going to make me healthier, or is this going to make me sicker?

Making the right decisions instantly got easier.

But not only easier. Happier. Choosing foods that would make me healthier felt good. Being in control felt good. And knowing that I was doing something to change my life for the better made me happy.

Being happy made it easier for me to continue to make the right choices for my health.

This journey is not about losing weight.


Three months after my doctor's fateful call, I went in to see him again.

In three months, the changes I had made dropped all the worrisome blood sugar numbers back into safe territory. I was no longer sick.

As it happened, I had also lost weight. But that wasn't what put the smile on my face. That wasn't what was making me happy that day.

I love my doctor very much. He's supportive, gentle and eminently reasonable. But I had to change the way he thought about my health, too.

"What's your goal?" he asked me at that three-month checkup.

"My goal is not to be sick," I answered.

"No," he responded, "I meant, what's your weight loss goal?"

"My weight loss goal is not to be sick," I said. "If I never lose another pound in my entire life, and my blood tests and other exams tell us that I'm healthy, then I will have reached my goal."

Few changes truly happen overnight.


Next time I see him, my doctor will probably ask me again about my weight loss goal. And I will probably have to remind him that, for me, this is not about losing weight.

My brain is still in transition mode, too. Sometimes I catch myself looking at my body sideways in the mirror, thinking "Why is my stomach still so huge? If I'm doing all the right things every single day, why haven't I lost more weight? Why aren't I smaller yet?"

And then I think about what I want. What I really, really want.

And I realize that I'm getting there.

And I step away from the mirror.

Wednesday, July 27, 2016

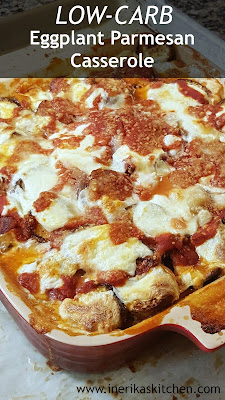
Low-carb eggplant parmesan casserole

  • Pin It
Low-carb eggplant parmesan casserole satisfies that ever-present pizza craving

I've adopted a low-carb diet over the past year to improve my health.

Once I decided that it was time to change what I eat and how I think about food, I found it relatively easy to stick with it. This health transformation has been much more about my head than my body.

But that doesn't mean I never have cravings. I do. Of course I do.

Once I eliminated most carbohydrates from my diet, I was surprised to find that pizza was the thing I craved most often. So I started thinking about pizza substitutes.

(For the record, I tried five different cauliflower crust recipes. Didn't do it for me.)

I started making this low-carb eggplant parmesan casserole a few weeks into my new lifestyle. I call it my "I Really Want Pizza Casserole."

It's got all the flavor of pizza, with my favorite (no added sugar) tomato sauce and stretchy mozzarella cheese. Eggplant stands in for the starch. And instead of breadcrumbs, I use almond flour to absorb some of the liquid.

The secret to getting the texture right is to bake the eggplant slices to dry them out a bit before assembling the casserole. That way the eggplant has some chewy heft to it and doesn't dissolve into mush.


print recipe

Low-Carb Eggplant Parmesan Casserole
This low-carb eggplant parmesan casserole has all the flavor of pizza without sabotaging your low-carbohydrate diet. The secret to getting the right texture: drying the eggplant slices in the oven before assembling the casserole.
Ingredients
  • 2 pounds eggplant (look for thinner ones if possible)
  • 2 cups tomato sauce
  • 1/2 cup almond flour
  • 1/2 cup grated parmesan cheese
  • 1 teaspoon garlic powder
  • 1/2 teaspoon salt
  • 1 teaspoon Italian seasoning
  • 2 cups mozzarella cheese, shredded
Instructions
Heat the oven to 375 degrees F. Line two baking sheets with parchment paper or foil, then spray with nonstick cooking spray.Slice the eggplants into 1/2-inch rounds (don't peel them). Lay the eggplant slices on the prepared baking sheets.Bake the eggplant slices for 30 minutes, until they are somewhat dried out and starting to look leathery. Remove the baking sheets from the oven and let cool 30 minutes. Leave the oven on.While the eggplant is baking, mix together the almond flour, parmesan cheese, garlic powder, salt, and Italian seasoning in a small bowl.Assemble the casserole: Spray a medium-sized casserole dish with nonstick cooking spray. Pour a few spoonfuls of tomato sauce in the bottom and spread it around. Lay down a layer of eggplant slices. Sprinkle over about 1/4 of the almond flour mixture, then some mozzarella. Drizzle some more of the sauce on top. Continue to layer the ingredients until all are used, ending with mozzarella and a drizzle of tomato sauce.Bake the casserole about 45 minutes, until the sauce is bubbling and the cheese is melted and golden brown in places on top. Serve hot.
Details
Prep time: Cook time: Total time: Yield: 6 servings

Make this low-carb eggplant parmesan casserole when you're craving pizza

Friday, July 22, 2016

Fresh corn tortillas with zucchini flowers

  • Pin It
Fresh corn tortillas with zucchini flowers

My specialty is making food that tastes good. I'm not quite so skilled when it comes to making food that's beautiful.

But when I saw these stunning fresh corn tortillas with zucchini flowers on Girl + Fire a few years back, I thought I'd take a shot. And guess what? It wasn't actually that hard.

I love zucchini season and have created a ton of favorite zucchini recipes over the years. This is one of them.

These tortillas with zucchini flowers aren't something I'm choosing to eat right now, but remember, I also cook for my family, and they don't need to restrict their foods just because I am.


Make your own fresh corn tortillas with Maseca corn flour

I've become a big fan of Maseca corn flour and now keep a bag in my pantry at all times. Mix Maseca with water to make dough, roll the dough into golf balls, press each one thin in a tortilla press, a minute in a nonstick skillet, and presto - tortillas. For a girl from Long Island who tasted her first tortilla long after her first legal margarita, it's pretty magical. 

Use a tortillas press to put the zucchini flowers onto the tortilla dough

You can use either waxed paper or plastic wrap to line the tortilla press and keep the tortillas from sticking to the press. If you don't have a tortilla press, I bet you could use the back of a heavy skillet and do it on the kitchen counter. (I haven't tried it, though, because a tortilla press is pretty easy to come by here in Los Angeles.)

Fresh corn tortillas embossed with zucchini blossoms

If you can't find zucchini flowers, any edible flower will do, or try a branch or two of tarragon, chive flowers, a few sprigs of dill, thin strips of roasted bell pepper, or sliced olives. 


print recipe

Fresh corn tortillas with zucchini flowers
Fresh corn tortillas are easy and quick to make. Press edible zucchini blossoms into the tortillas for a dramatic presentation. Look for zucchini flowers at gourmet grocery stores or local farmers markets.
Ingredients
  • 2 cups Maseca corn flour
  • about 1 1/4 cups water
  • 1/2 tsp salt
  • 12-16 zucchini flowers, washed and gently patted dry
Instructions
In a medium-sized bowl, stir together the Maseca and water until a soft dough forms. It should be moist but not sticky. Roll the dough into balls about 2 inches in diameter, somewhere between a walnut and a golf ball. Cover the dough balls with a damp towel or a piece of plastic wrap to keep them from drying out.Line a tortilla press with waxed paper or plastic wrap. Place one dough ball on the press, put another piece of waxed paper or plastic wrap on top, and press down to flatten the tortilla. Lift the press, put one flower on the tortilla, replace the paper or plastic, and press down again gently to embed the flower into the raw tortilla.Heat a nonstick skillet over medium-high heat. Cook the tortilla until dry and cooked through, flipping to make sure both sides are cooked. Move the finished tortilla to a plate and cover with aluminum foil to keep it warm. Continue with the rest of the tortilla dough and zucchini flowers. While one tortilla is cooking, press the next so it is waiting when the pan is empty. Serve warm.
Details
Prep time: Cook time: Total time: Yield: 12-16 6-inch tortillas

Wednesday, July 20, 2016

Conquering diabetes: Breaking bad habits

  • Pin It
Summer chopped salad with cucumbers, red bell peppers cherry tomatoes and avocado
One new habit: I take my lunch to work instead of relying on takeout

Previous | NextSeries index

Shortly after I got the doctor's call last summer and decided to attack my diabetes and take control of my health, I realized that I had developed a lot of bad habits.

It felt like the bad habits had crept up on me.

It's not like I had actually decided to eat poorly, eat too much, and stop exercising. I mean...who would make those decisions consciously?

But for whatever reason, that's exactly what I had done for years: eat poorly, eat too much, and avoid exercise.

My bad habits


These were a few of my bad habits:
  • Eating because it was time to eat, not because I was hungry
  • Eating because I was bored, not because I was hungry
  • Eating because I was afraid that at some point in the future I might be hungry
  • Sitting on my ass instead of exercising
  • Building meals around carbohydrates
In the past I might have sat around for a few days, or weeks, or months, trying to figure out how I'd gotten to where I was. Thinking that if I understood how it happened, I'd be able to avoid it in the future.

This time I didn't give the past a moment's thought. It didn't matter why or how I'd developed those bad habits. All that mattered was what I could do to change them.

Breaking habits is hard.


I was about to write "I can't tell you how many times I had tried to break these bad habits in the past."

But as I was typing it, I realized that it wasn't true.

I had never really tried to break these habits before. Instead, I made excuses for why I didn't need to break them.

I might have made half-hearted attempts to change my eating and exercise habits. But in my mind, the changes were temporary. They were things I had to do to achieve whatever short-term goal was in front of me: losing weight, mostly.

But as soon as I was near the goal, I screamed "I'M DONE!" in my head and went right back to my old habits. With predictable results.

This time is different.


This time is different because I have decided that the bad habits are gone for good.

My new habits are the way it's going to be for the rest of my life. Without excuses.

Another new habit: Evening walks with friends
Another new habit: Evening walk-and-talks with friends (hi Sue!)


This next part is going to sound a little crazy, but it's true: I started breaking my bad habits by talking to myself. 

I'll write more about this in another post, but for now, think of it like leaving yourself notes on your bathroom mirror.

Focusing on long-term goals felt overwhelming. So I decided to stay in the moment. And that's what I talked to myself about.

Every day I asked myself: What am I going to do today? What can I do right now, right this second, to make myself healthier? What decisions will I make today that will move things in the right direction?

I figured if I could do the right things today, then I could wake up and decide to do the right things again tomorrow. And then the day after that.

One day at a time, I ate better, ate less, ate only when I was hungry, and exercised.

One day at a time, I made new habits.

My new habits


I like my new habits. And I plan to keep them. Some of them are:
  • Exercise, every single day, usually first thing in the morning
  • Eat only when I am physically hungry
  • Avoid most carbohydrates (here are the details on what I choose to eat, what I choose to avoid, and why)
  • Build meals around vegetables and protein, in that order
  • Pack lunch to take to work (mostly to save money, but also to make sure I have food I like that's good for me)
  • Drink more liquids (water, iced decaffeinated tea, and iced decaffeinated coffee with unsweetened almond milk)
  • Eat some dark chocolate every day...because, you know, CHOCOLATE
  • Put myself and my needs first as often as possible
That last one is important. It's easy for parents, particularly moms, to subjugate our needs to those of our children. 

Sometimes, of course, it's the right thing to do. If my kid is bleeding and needs to go to the emergency room, I'm not going to say "Hang on, honey, I've only got 10 minutes left on the elliptical."

But daily exercise is a need for me. It's not a nice-to-have. It's a have-to-have, or my health will suffer.

So if my kid wants a ride to school because he's running late and doesn't feel like race-walking with a heavy backpack, and giving him a ride means I won't get to exercise before going to work...guess what? He's walking.

If there's one portion of last night's dinner left and I can either pack it in my lunchbox or leave it for my husband...I pack it.

If my husband and kids want to go out for sushi, or Chinese food, or burgers and fries, or ice cream, and I'm either not hungry or don't want to eat what they want to eat...I stay home and knit while watching something extremely girly on Netflix. Or I get a pedicure. (When you live with three men, you seize all opportunities to do girly things.)

There's one new habit I have tried hard not to set, by the way: I am not my family's Food and Exercise Police. And I don't intend to be. I'm leading by example, but they need to do what's right for them and make their own decisions.

Wednesday, July 13, 2016

Oven-baked parsnip fries

  • Pin It
Oven baked parsnip fries

Oven-roasted vegetables cut into sticks, like these baked parsnip fries, have gotten my kids to eat a ton of vegetables without complaint over the years.

I don't believe in hiding vegetables for kids. I puree them into soup (cauliflower soup, celery soup, even lettuce soup). I sauce them up with cheese (zucchini rice casserole, zucchini gratin). I shred them or chop them and fry them up into pancakes (bacon corn fritters, spinach pancakes, zucchini fritters). These are vegetables transformed, not disguised. I see this as a completely legitimate way to get kids to eat more vegetables.

And yes, I know my kids are teenagers. Sometimes they still need a reminder.

I'm also a fan of trompe l'oeil. Inside an old European cathedral, this artistic technique, literally translated from the French as "fools the eye," means wood painted to look like marble. In my kitchen, trompe l'oeil means vegetables other than white potatoes cut and cooked like french fries.

I have nothing against potatoes - in fact, it's my family's overwhelming love for potatoes that makes this slick family-feeding technique possible in the first place. I've made "fake fries" out of carrots, sweet potatoes, kohlrabi, turnips, black radishes, zucchini and broccoli stems. Cut in batons, toss with olive oil and salt, oven-roast on a baking sheet until brown and crisp. If you can pick it up with your fingers and dip it in Not Ketchup, it's a winner with my family.

My favorite french fry substitute is the sweet, pale parsnip, whose sugars concentrate and flavors intensify exponentially when prepared this way. I don't eat a lot of starchy vegetables at the moment, but I've been known to make these for dinner and eat the whole batch standing at the counter before I've even called the kids to the table. No one loves fries more than I do.


>print recipe

Baked parsnip fries
A great alternative to traditional french fries, these parsnip fries bake up sweet and crispy.
Ingredients
  • 2 pounds parsnips, washed and peeled
  • 2 Tbsp olive oil
  • 1/2 tsp sea salt
Instructions
Preheat the oven to 400 degrees.Cut the parsnips into batons. It doesn't really matter exactly how you do it, but you're looking to get the pieces more or less the same size so they cook at the same speed. Parsnips tend to be much thicker at the top than at the root end, so this may take some creative cutting. No need to be obsessive about it; do the best you can.Scatter the parsnip batons on a rimmed baking sheet, drizzle over the olive oil, and sprinkle on the salt. Using your hands, toss the parsnip pieces until the oil and salt are well distributed. Spread the parsnip pieces out into a single layer.Roast the parsnip fries 20-30 minutes, checking every 10 minutes and, if you like, tossing them around with a spatula once or twice to brown them evenly. Take them out when they've got nice brown edges and spots, but don't let them burn - blackened parsnip fries are bitter (and yes, I speak from experience). Serve immediately.
Details
Prep time: Cook time: Total time: Yield: 4-6 servings

Thursday, July 7, 2016

Steakhouse-style blue cheese dressing

  • Pin It
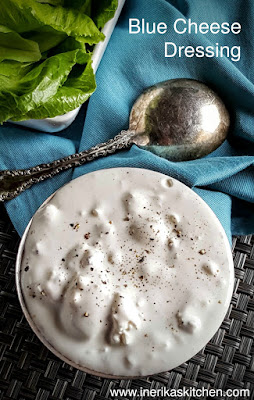
Steakhouse style blue cheese dressing with big chunks of bleu cheese


One of the reasons I decided to try a low-carb diet when it was time to improve my health (although I hate that word, diet, so let's call it a low-carb style of eating) is that I cannot live without blue cheese dressing.

This is not hyperbole.

The first time I tasted blue cheese dressing on a salad I was nine. It was late winter. My parents had decided to drive the family out to the east end of Long Island for a seafood dinner, so maybe we were in Greenport, or Orient Point, or even Montauk.

I'm not sure what prompted me to order blue cheese dressing for my salad. But with my first bite, these words formed clearly in my pre-adolescent brain:

I can't live without this.


I don't ever recall a stronger reaction to a taste. Not before that day, and not since.

Ever since I committed to myself that I was going to get healthier, I have been packing raw vegetables in my lunchbox every day, along with a container of this homemade blue cheese dressing. I love to dip. Lettuce, cucumber, radishes, carrots, bell peppers, celery, kohlrabi, cherry tomatoes: They all taste better dunked in blue cheese dressing.

This easy recipe takes less than five minutes to put together. The key is to let it sit overnight. It's much, much better after a rest in the refrigerator.


print recipe

Homemade Blue Cheese Dressing
This steakhouse-style blue cheese dressing is packed with umami-rich chunks of pungent blue cheese. Let it rest in the refrigerator overnight for maximum flavor. This makes a very thick dressing - if you prefer a thinner consistency, add a little water or heavy cream.
Ingredients
  • 1 pint (2 cups) sour cream
  • 1 cup mayonnaise
  • 2 Tablespoons fresh lemon juice (about half a lemon), or to taste
  • a few dashes hot sauce, like Tabasco
  • 1 Tablespoon Asian fish sauce (can substitute Worcestershire sauce)
  • 1/2 teaspoon freshly ground black pepper, or more to taste
  • 12 ounces blue cheese, crumbled
Instructions
In a medium-sized bowl, whisk together the sour cream, mayonnaise, lemon juice, hot sauce, fish sauce, and pepper. Add the crumbled blue cheese and stir to combine, mashing the cheese with the back of your spoon if the chunks are too big.Transfer to an airtight container. Refrigerate overnight before serving.
Details
Prep time: Cook time: Total time: Yield: 4 cups


This thick, chunky homemade blue cheese dressing makes the perfect umami-rich dip for raw vegetables or salad

Tuesday, July 5, 2016

Conquering diabetes: What I eat

  • Pin It
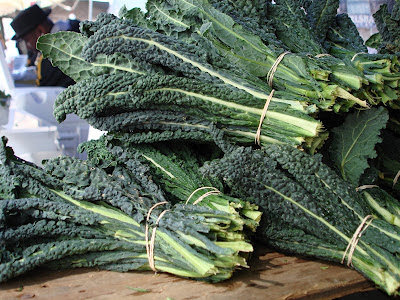
Dinosaur kale or lacinato kale
Yes, kale - just one of the many vegetables I'm eating a lot of these days

Previous: Need vs. want
Series index: How to change your life

Ever since I decided to attack my diabetes, improve my health and change my life, I have gotten one question more than any other from friends, family, and even strangers.

What do you eat?


The short answer: I eat anything I believe will help me get healthier and stay that way.

I want to share with you the basic low-carb guidelines I try to follow 95% of the time to control my diabetes.

I want to stress that this is the approach I decided to take for my body and my health. I am not saying this is what you should do. This is what has worked for me, period.

What I eat daily: protein, vegetables, and fat


Protein includes beef, lamb, bison, pork, chicken, turkey, fish, shellfish, eggs, some tofu, and probably a few more animals I'm forgetting. I eat protein at every meal — sometimes a little, sometimes a lot.

Vegetables includes everything green and most things orange, red, yellow and purple. I eat lettuce, kale, chard, bell peppers, carrots, tomatoes, onions, eggplant and zucchini. I eat more vegetables than anything else.

Fat includes butter, olive oil, avocado oil, avocados, nuts, nut butter, coconut, coconut oil and cheese. I don't skimp on fat. 

What I eat occasionally: fruit, legumes, chocolate


Fruit includes strawberries, raspberries, blackberries, blueberries, and occasionally other summer fruits like nectarines, melons, peaches and cherries. By "occasionally" I mean once or twice a week. In the winter I hardly ate any fruit at all; now that it's summer I'll probably have one serving of fruit 3-4 times per week. Why the seasonal difference? I like summer fruit more than winter fruit.

Legumes includes black beans, garbanzo beans or other incidental legumes that show up in restaurant dishes. I don't seek legumes out, but if they're in something I've ordered I won't pick them out.

Chocolate includes dark chocolate, usually 85%. I also like the stevia-sweetened chocolate from Lily's Sweets. I eat a few squares each week. A girl needs her antioxidants.

What I choose to avoid: grains, starchy vegetables, sugar


Grains includes wheat, barley, rye, corn, millet, oats...the whole category. The one exception I make sometimes are these low-carb tortillas by La Tortilla Factory. I eat 3-4 of these per week.

Starchy vegetables include potatoes, sweet potatoes, yucca, plantains and butternut squash.

Sugar includes anything containing sugar, honey, molasses, coconut sugar, agave, or any other sweetener.

No, I don't feel deprived


I settled on this way of eating because I thought it was well-suited for my tastes, my body and my life.

  • I am apple-shaped and thus more likely to suffer from the cluster of challenges associated with metabolic syndrome. Some studies have recommended a low-carb diet for people with metabolic syndrome.
  • I like low-carb foods.
  • I wanted to focus on eating more vegetables.
  • I don't have a sweet tooth. 
  • I had never tried eating low-carb and know people who find it satisfying and helpful.
  • I tend to overdo it on starchy foods, so for now it's easier to eliminate them entirely. (This may not always be the case. Or it may. I don't actually miss them.)
  • It felt like something I might be able to do every single day for the rest of my life. I was looking for a lifestyle, not a diet. This has to last.

Got questions? I'd love to hear them, so leave me a comment. Just know that some of the answers are going to be along the lines of "because that's what felt right to me" instead of having any scientific foundation.