Showing posts with label dinner. Show all posts

Thursday, March 28, 2019

Skillet chicken piccata - keto, low carb, paleo, Whole30

  • Pin It

I am very, very excited about recipes I can make in one skillet. Because then I only have one skillet to wash when dinner is over.

This Skillet Chicken Piccata has all of my favorite things: chicken thighs, lemon, capers, olives, and wine. It was ready half an hour after I walked in the door last night. It fits into my keto low carb diet, and if you're eating paleo or Whole30 it works for that too.

And if my husband hadn't been elbowing me out the way, I would have eaten the whole thing standing up at the counter.


I love boneless skinless chicken thighs. They've got all of that amazing chicken flavor, they don't dry out, they're impossible to overcook, and while I do love chicken skin, sometimes it's just easier not to have to deal with skin and bones.

This is my new favorite easy dinner recipe. Enjoy!


Yield: 4

Skillet Chicken Piccata

prep time: 10 minscook time: 20 minstotal time: 30 mins
An easy one-pan chicken dinner, bright and tangy with lemon, capers, olives and white wine.

ingredients:

  • 8 boneless skinless chicken thighs
  • Salt and pepper
  • 2 teaspoons olive oil
  • 1 lemon (Meyer or regular), thinly sliced
  • 1/4 cup finely chopped olives, any kind
  • 3 Tablespoons capers
  • 1/4 cup white wine

instructions:

  1. Sprinkle salt and pepper liberally on both sides of the chicken thighs. Heat the oven to 375 degrees.
  2. Heat the olive oil in a large ovenproof skillet over medium-high heat.
  3. Add the chicken to the skillet and cook until golden brown on both sides, 2-3 minutes per side.  Turn off the heat. 
  4. Scatter the lemon slices, olives and capers around the chicken, tucking the lemon slices between the chicken thighs. Pour the white wine into the pan and transfer the skillet to the oven.
  5. Bake the chicken about 20 minutes, until the lemon slices are wilted and starting to char, the chicken is golden brown and cooked through, and the liquid in the pan is reduced and syrupy.  Serve immediately.
Created using The Recipes Generator

Sunday, January 28, 2018

Low carb stuffed peppers with Fruitchup

  • Pin It
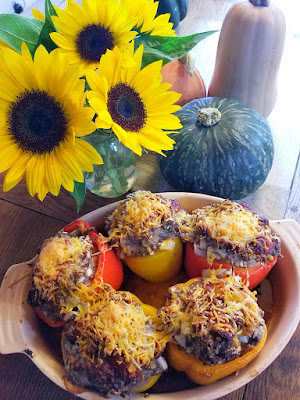
Low carb baked stuffed peppers with a filling of beef, vegetables and cheese in a baking dish

Low carb stuffed peppers are one of my favorite meals. Bell peppers make such a tidy receptacle for a stuffing made of ground beef, vegetables, and cheese! I make these almost every week and often pack one in my lunchbox to take to the office. This is one of those easy, delicious low carb recipes that fits perfectly into my keto diet.

Use any vegetables you have around—I particularly like using spinach and cauliflower rice. My secret ingredient is prepared spinach artichoke dip, which is made with cream cheese and serves as a perfect base to hold everything together. And then, of course, I include some Fruitchup, my delicious fruit-sweetened tomato ketchup (the best Paleo ketchup you'll find!), which goes into the mixture and gets painted on top before the final shower of cheese.

More of my favorite low carb recipes:
Lemon chicken with fresh cranberries
Keto mushroom quiche with an almond flour crust
Pork belly "fries"


print recipe

Low carb stuffed peppers with Fruitchup
Low carb stuffed peppers are filled with ground beef, cauliflower rice and cheese, then topped with Fruitchup Paleo ketchup before baking. A delicious keto dinner recipe.
Ingredients
  • 6 large bell peppers
  • 1.5 pounds ground beef
  • 2 cups cauliflower rice (raw)
  • 2 cups baby spinach, chopped
  • 1 medium onion, chopped
  • 1 cup prepared spinach artichoke dip or softened cream cheese
  • 2 cups shredded cheddar cheese
  • 3/4 cup Fruitchup paleo ketchup
  • salt and pepper to taste
Instructions
Cut the tops off the bell peppers, then scoop out the seeds and ribs. Set aside.Heat the oven to 350 degrees. Spray a baking dish large enough to hold the peppers snugly (standing up).In a large bowl, mix together the ground beef, cauliflower rice, spinach, onion, spinach artichoke dip or cream cheese, 1.5 cups shredded cheddar cheese, 1/2 cup Fruitchup, and salt and pepper to taste. It's easiest to use your hands.Using a spoon or your hands, stuff each pepper with the meat mixture. Set the peppers in the baking dish. Spread the remaining 1/4 cup Fruitchup on top of the peppers, then sprinkle with the remaining 1/2 cup cheddar cheese.Bake the stuffed peppers about 1 hour, until the meat mixture is cooked through and the peppers are soft. Serve immediately.
Details
Prep time: Cook time: Total time: Yield: 6 servings

Sunday, September 18, 2016

Cheeseburger stuffed mushrooms recipe {low carb}

  • Pin It

When I started eating a low-carb diet, my family's diet changed too.

My (healthy) husband and two (healthy) teenage boys do not and should not have to eat as carefully as I do. They don't have the health problems that prompted me to make these changes.

But I am my family's primary grocery shopper, meal preparer, refrigerator stocker and lunchbox packer.

I also have a full-time job and a side business to run (my Not Ketchup sauces).

All of which means I am not very interested in making two sets of meals - one for me and one for the rest of the family.

My protein-loving family loves most of the low-carb foods I have been enjoying. These Cheeseburger Stuffed Mushrooms disappeared quickly. I glazed some of them with my new *No Sugar Added* Cherry Chipotle Not Ketchup, and that was also a big hit.

I love these Cheeseburger Stuffed Mushrooms because they're easy, fast, low-carb, and FUN. Dinner tastes so much better when you can eat it with your fingers, don't you think? These would also be a great low-carb appetizer for a cocktail party.

Cheeseburger Stuffed Mushrooms


Ingredients


  • 12 large mushrooms (I used crimini mushrooms)
  • 1 Tablespoon olive oil
  • 1/2 pound ground beef
  • 1/2 onion, minced
  • 2 cloves garlic, minced
  • 1/2 teaspoon salt
  • Freshly ground pepper
  • 1/2 cup shredded or finely chopped cheese (I used sharp cheddar)
  • Optional: 1/2 cup *No Sugar Added* Cherry Chipotle Not Ketchup sauce


Instructions


  1. Heat the oven to 400 degrees F. Line a baking sheet with foil or parchment paper.
  2. Wash the mushrooms and carefully pop out the stems. Brush each mushroom with olive oil and lay it on the baking sheet.
  3. Put the mushrooms in the oven for about 10 minutes. The idea is to cook them partially before stuffing them to concentrate the mushroom flavor a bit and get out some of the liquid.
  4. While the mushrooms are cooking, mix together the ground beef, onion, garlic, salt, pepper and cheese in a bowl. Roll the beef mixture gently into 12 balls.
  5. Remove the mushrooms from the oven, then put one beef ball inside each mushroom. Press down gently and smooth the beef mixture so it fills the entire hole and extends all the way to the edges of the mushrooms. If using the Not Ketchup, brush about a teaspoon on top of each stuffed mushroom. 
  6. Return the now-stuffed mushrooms to the oven for 25-30 minutes, until the beef is cooked through. Serve immediately with more Not Ketchup for dipping.

Preparation time: 45 minutes | 6 servings

Friday, May 6, 2016

Meyer lemon chicken thighs

  • Pin It

Meyer lemon chicken thighs. This is one of the easiest chicken dishes I have ever made, and I love it beyond all others.

It uses four ingredients, and that's counting salt and pepper. 

It's made in one pan (a heavy, ovenproof skillet).

It's fancy enough for company. 

It's paleo, gluten-free, grain-free, dairy-free, whole 30, low-carb, and probably ticks a few more boxes as well.

Oh. And it's delicious.

If you can't get your hands on Meyer lemons, any old lemon will do. I like Meyer lemons because they have an almost floral aroma and are less acidic than standard lemons. Also because they grow in my backyard. But seriously, use whatever lemons you have.

Ready? Time to cook.


print recipe

Meyer Lemon Chicken Thighs
A simple, delicious, stunningly beautiful chicken dish you will serve again and again. You need four ingredients, one hour, and a hearty appetite.
Ingredients
  • 1 Meyer lemon (or regular lemon)
  • 4 large chicken thighs, bone in and skin on
  • 1/2 teaspoon salt
  • 1/8 teaspoon freshly ground black pepper
Instructions
Heat the oven to 350 degrees F.Using a sharp knife, slice the lemon into very thin rounds. Set aside. Sprinkle both sides of the chicken thighs with the salt and pepper.Heat a large, heavy, ovenproof skillet over medium-high heat. Lay the chicken thighs in the skillet, skin side down. Cook without moving for about 6 minutes, until some of the fat has rendered and the skin is golden brown and crisp.Turn over the chicken thighs so the skin side is up. Lay a thin lemon slice on top of each chicken thigh. Tuck the remaining lemon pieces into the skillet, around the chicken pieces. Put the skillet into the oven. Roast about 45 minutes, until the chicken is cooked through. If the lemon slices haven't started to caramelize (turn brown around the edges), turn on the broiler for no more than 1-2 minutes, watching the chicken carefully so it doesn't burn.Remove from the oven and serve immediately.
Details
Prep time: Cook time: Total time: Yield: 4 servings

Thursday, January 28, 2016

Roast chicken with 40 cloves of garlic

  • Pin It

To paraphrase a popular chick flick:

In winter, we eat chicken with garlic.

On pink plates.

Note: This recipe is super easy when you buy one of those huge containers of peeled garlic cloves from Costco (or whichever big-box store you frequent).


print recipe

Roasted Garlic Chicken
Chicken. Garlic. Oven. What else do you need?
Ingredients
  • 8 large chicken thighs, bone-in and skin on
  • 1 Tablespoon herbes de Provence, Italian herb mix, or any other dried herb mix you prefer
  • 1 cup fresh garlic cloves, peeled
  • 1 lemon
  • 1/4 cup olive oil
  • salt and pepper
Instructions
Heat the oven to 450 degrees. Spray a large roasting pan with nonstick cooking spray.Lay the chicken pieces in the pan, skin side up. Sprinkle them with the dried herb mix and scatter the garlic cloves around them. Cut the lemon in half and squeeze the juice over the chicken. Put the lemon halves in the roasting pan. Drizzle the chicken with the olive oil, then shower it generously with salt and pepper.Turn the chicken pieces over so the skin side is down. Put the roasting pan in the oven. Set the timer for 15 minutes. (This step crisps the skin.)After 15 minutes, turn the heat down to 350 degrees. Bake another 40 minutes or until the chicken thighs are cooked through and very tender.Serve the chicken skin side up with the garlic cloves and pan juices poured over.
Details
Prep time: Cook time: Total time: Yield: 4 servings

Tuesday, January 6, 2015

Glazed salmon fillets with Cherry Chipotle Not Ketchup

  • Pin It
Glazed salmon fillets with Cherry Chipotle Not Ketchup

When I first created my Not Ketchup fruit ketchups, I really only thought about using them on meat. Burgers, steak, chicken, sausages, lamb chops, pork chops, ribs. Meaty meat.

But after spending a lot of time at Santa Monica Seafood - the best retail seafood market, wholesale seafood distributor and seafood cafe in southern California, and an enthusiastic supporter of Not Ketchup from the very beginning - I realized that Cherry Chipotle Not Ketchup, with its perfectly balanced combination of sweet, salty, tangy, and slightly spicy, would pair well with rich, buttery salmon fillets.

This recipe puts the salmon under the broiler, but you can do it on the grill as well. Just make sure you don't put the fish too close to the heat source - you want the Not Ketchup to caramelize and bubble without burning.


Cherry Chipotle Not Ketchup Glazed Salmon

Erika Kerekes
Published 01/06/2015
Cherry Chipotle Not Ketchup Glazed Salmon Fillets
Cherry Chipotle Not Ketchup fruit ketchup sauce makes a sweet, tangy, slightly spicy glaze for oven-roasted salmon fillets. A delicious and easy gourmet dinner.

Ingredients

Instructions

  1. Preheat the broiler until very hot, with the oven rack about 4 inches below the heat.
  2. Line a sheet pan with foil and spray with nonstick cooking spray. Place the salmon fillets on the baking sheet and sprinkle with salt and pepper.
  3. Using a basting brush or the back of a spoon, spread each fillet generously on all sides with ⅓ of the Cherry Chipotle Not Ketchup. Broil the salmon 2-3 minutes, until the Not Ketchup coating starts to brown and sizzle.
  4. Remove the baking pan from the oven. Slather the salmon with another layer of Cherry Chipotle Not Ketchup. Return the baking sheet to the oven for another 3-4 minutes, watching carefully to make sure the salmon doesn’t burn. The salmon is done when the outside is browned and bubbling and the inside is cooked through.
  5. Drizzle the remaining Cherry Chipotle Not Ketchup over the top of the salmon fillets and serve immediately.
Yield: 4 servings
Prep Time: 00 hrs. 05 mins.
Cook time: 00 hrs. 10 mins.
Total time: 15 mins.
Tags: seafood, fish, salmon, dinner, Not Ketchup, chipotle

Wednesday, August 27, 2014

How to dress up rotisserie chicken, and big news about Not Ketchup

  • Pin It
Cherry Chipotle Not Ketchup fruit ketchup sauce at Sam's Club Fountain Valley with CEO Erika Kerekes
Cherry Chipotle Not Ketchup on the floor at Sam's Club - yes, that's right, Sam's Club

I haven't had a lot of time to cook lately, and the photo above is one reason why.

This summer has been all about Not Ketchup, my new food business. While my kids were away at camp, I made cold calls, met with new retailers, spoke at a conference, did store demos, and generally ran around trying to get Not Ketchup into the hands and mouths of food lovers around the country.

Last week marked a big day for Not Ketchup: After half a year of negotiating and paperwork, Sam's Club in Fountain Valley, about 45 minutes south of my home, started selling a two-pack of Cherry Chipotle Not Ketchup. I went down there to offer samples to Sam's Club members a few days ago and the response was great, from both customers and the people who work there. I was nervous but the day went really well. And I can't tell you how proud I was to see my product featured in the food section next to brands that have been around for decades.

Rotisserie chicken glazed with Not Ketchup fruit ketchup sauce
Store-bought rotisserie chicken gets a glam makeover with a Not Ketchup glaze

Ironically, the more involved I get in building my food business, the less time I spend in the kitchen. One of my favorite shortcuts is to pick up a store-bought rotisserie chicken and glam it up with Not Ketchup. Two minutes of work, 10 minutes in the oven, and you end up with a delicious, juicy bird glazed with a tangy, fruity sauce. Serve a little more Not Ketchup on the side for dipping, throw together a salad or steam some vegetables, and dinner is done.

I promise to get back to a more normal blogging schedule with real recipes soon...someday...well, if I'm being honest, probably not that soon. Que sera, sera. Apologies and thanks for bearing with me.


print recipe

Rotisserie Chicken with Not Ketchup
Dress up a store-bought rotisserie chicken by brushing it with any flavor of Not Ketchup fruit "ketchup" sauce. Two minutes of work, 10 minutes in the oven, and dinner is ready.
Ingredients
  • 1 store-bought rotisserie chicken, cooked
  • 1 cup Not Ketchup sauce, any flavor, plus more for serving
Instructions
Preheat the oven to 450 degrees.Put the rotisserie chicken in a baking dish. Pour the Not Ketchup over the chicken and spread into all the crevices with your hands or the back of a spoon.Warm the chicken in the oven 10-15 minutes, until the Not Ketchup glaze is bubbling and looks glossy and sticky. Take the chicken out of the oven and let rest 5 minutes. Serve immediately with more Not Ketchup on the side for dipping.
Details
Prep time: Cook time: Total time: Yield: 4 servings

Wednesday, July 16, 2014

Erika's ultimate chicken burger, no grill required

  • Pin It

I know you're supposed to grill burgers.

But for chicken burgers - even when the ground chicken mixture includes plenty of dark meat - I find the grill too aggressive. There's nothing worse than a dry chicken burger. And that's what I get when I cook chicken burgers on the grill.

My favorite chicken burger is moist, well seasoned, studded with chopped green onions, and cooked in a skillet on the stove. Three ingredients, not counting the bun, the garnish, and the sauce. You'll have dinner on the table in less than half an hour.

About the sauce: My favorite for chicken burgers is Blueberry White Pepper Not Ketchup. The combination of sweet, tangy, peppery and savory brings a lot of zest to the delicate chicken. In fact, when I was first working on the recipes for my Not Ketchup sauces, I tested the blueberry prototype on chicken breasts, chicken thighs, chicken tenders, and roast chicken. Blueberries and chicken...who knew?


print recipe

Erika's Ultimate Chicken Burger
A moist chicken burger that's well seasoned, studded with green onions, and served with Blueberry White Pepper Not Ketchup.
Ingredients
  • 1 pound ground chicken
  • 1/2 cup green onions, chopped
  • 1 teaspoon garlic salt
  • 1 Tablespoon olive oil
  • 4 burger buns or rolls
  • 1 cup Blueberry White Pepper Not Ketchup
  • 2 cups baby lettuce mix or arugula
Instructions
In a large bowl, mix the ground chicken, green onions, and garlic salt with your hands until well combined. Divide the chicken mixture into four equal parts, then shape into four patties.Heat a large nonstick skillet over medium heat. Add the olive oil, then place the chicken burgers in the pan. Cook about 10 minutes on the first side, then flip and cook until the burgers are cooked all the way through, about 8 minutes more. Put the burgers on a plate, cover with foil, and let rest 5 minutes.To serve, spread some Blueberry White Pepper Not Ketchup on the bottom half of each bun and place a chicken burger on it. Drizzle with more Not Ketchup, add a handful of lettuce or arugula to each burger, and place the other half of each bun on top. Serve immediately.
Details
Prep time: Cook time: Total time: Yield: 4 servings

Monday, June 2, 2014

Pulled pork baked taquitos

  • Pin It

If it were January, I'd be making some New Year's resolutions.

Work less. Pay more attention to the kids. Stop multitasking. Breathe. Exercise. Cook dinner. Blog more!

But it's June. I can't work less or important things won't get done. My kids are busy themselves, thank goodness, too busy to realize just how distracted I've been. Multitasking feels essential. I'm breathing and occasionally exercising. Cooking dinner? A few times a week, better than nothing.

But hey, at least I'm here writing this post.

On Memorial Day, for the first time in months, we had friends over for dinner. I made pulled pork and (of course) served it with a Not Ketchup bar. Guess what? All four flavors taste great when mixed with slow-cooked shredded pork shoulder. My favorite for pulled pork is Cherry Chipotle Not Ketchup, with Spiced Fig Not Ketchup a close second. Blueberry Not Ketchup always has its fans. And Smoky Date Not Ketchup is a good all-around choice too, especially for kids who might not like the spices in the other flavors.

The next day I mixed the leftover pulled pork with shredded Mexican blend cheese and rolled it up in flour tortillas, then baked them until crispy. It was one of those forehead-smacking moments: Why haven't I ever thought to do this before? They were tasty and so much fun to eat - especially when we dipped them into guacamole and more Not Ketchup.

Of course, you can put just about anything inside a tortilla and roll it up. Beans, cooked vegetables, leftover rice, chopped rotisserie chicken. Just mix it with some shredded cheese before rolling and baking. And serve a delicious dip on the side.


print recipe

Pulled pork baked taquitos
Mix pulled pork with shredded cheese, roll it up in flour tortillas, and bake in the oven until crispy. Serve with a fun dip on the side, like guacamole, salsa, or Cherry Chipotle Not Ketchup sauce.
Ingredients
Instructions
Preheat the oven to 375 degrees F. Line a baking sheet with aluminum foil, then spray the foil lightly with cooking spray.In a medium-sized mixing bowl, blend the pulled pork with the shredded cheese with a large spoon.Lay one tortilla on a cutting board and spoon about 1/4 cup of the filling lengthwise on the bottom third of the tortilla. Roll the tortilla up tightly around the filling. Lay the taquito on the baking sheet, seam side down. Repeat with the remaining tortillas and filling.Bake the taquitos until golden brown and crisp, 10-15 minutes. Serve immediately with guacamole and Cherry Chipotle Not Ketchup on the side.
Details
Prep time: Cook time: Total time: Yield: 8 taquitos

Monday, May 5, 2014

Arianna Trading Company organic tomatoes: A "good news, bad news" story

  • Pin It
GOOD NEWS: Last week I got to see my friend George Menzelos of Arianna Trading Company. George has been importing the most beautiful single-estate organic olive oil from Greece for a few years now, and this year he's also bringing in organic tomatoes, currants, and a sesame herb salt. George left me samples of all his products to inspire my cooking and, we hoped, a blog post or two.

BAD NEWS: After George's visit, I got buried in work, both for a new client and for Not Ketchup. A few days after I saw George, I was stuck in my home office until after 10pm. I didn't even have time to make dinner for my family.

GOOD NEWS: My 15-year-old son Emery decided to make dinner. He cooked up penne pasta with a rich tomato meat sauce. Emery even brought a bowl down to the office for me.

GOOD NEWS: That was the most delicious bowl of pasta I've ever eaten - not only because my child made it for me (what mother could resist the charms of that?) but because the tomato sauce was sweet, thick, and intense.

BAD NEWS: A few hours later I realized that I might have heard Emery say something like "I decided to make pasta because you had all these tomato products." I went to the refrigerator. George's tomatoes were gone. And on the drying rack I found this:


BAD NEWS: I hadn't taken any pictures and we'd eaten all the pasta. Hard to write a blog post without pictures.

GOOD NEWS: I found some leftover sauce in the refrigerator, so I photographed that instead. It was so delicious that I ate it the next day straight from the plastic container with a spoon. Cold.


GOOD NEWS: See the line above about "the most delicious bowl of pasta I've ever eaten."

Arianna's organic strained tomatoes will be available very soon - and when they are, I suggest you run right out and get some (keep an eye on the Arianna website to find out where to buy them). Here's what George says about his organic strained tomatoes:
Our organic heirloom tomatoes are hand-picked ripe from the vine, then peeled, seeded, and strained by mechanical means in an allergan-free facility. These GMO-free "true breed" tomatoes have been cultivated by the Gousiaris family in the village of Ilias in central Greece for over 100 years. It takes 5 kilos of tomatoes to produce about 1 kilo of our strained tomatoes, which are pasteurized in the jar the old-fashioned way. They are tomatoes your grandmother would love.
CONCLUSION: Emery's pasta was indeed a happy accident. I'm thrilled that I'm no longer the only cook in the family, but clearly I need to get better about labeling the food in the refrigerator if I need to keep it for blogging!

Thursday, March 20, 2014

Blueberry Not Ketchup lamb chops

  • Pin It
Lamb chops take a bath in Blueberry White Pepper Not Ketchup
Photo: Karen Ard/ FarmToTableLA.com

How do you like your lamb chops? I always want a little sweetness with my lamb, but I've never understood mint jelly. It always makes me think of toothpaste - definitely not what I want with a nice meaty lamb chop.

Lately I've been pairing lamb chops with Blueberry White Pepper Not Ketchup. Lamb with blueberries may seem unexpected, but trust me: It's a winning combination. The Not Ketchup has plenty of tang (that's the apple cider vinegar, plus the natural acids in the blueberries), which cuts neatly through the fatty mouthfeel of the lamb. And the dusky warmth of the white pepper finishes each bite with a little assertive pinch.

You can use either lamb loin chops or lamb rib chops. Either way, the method is the same: Salt and pepper the meat, brown it on the stove in an ovenproof skillet, brush on a healthy layer of Blueberry White Pepper Not Ketchup, and stick it in the oven to finish cooking. It's a quick, elegant dinner your family and friends will learn to crave.

Learn more about Not Ketchup, my new line of gourmet fruit ketchups, and order online at http://www.notketchup.com. Thanks to fellow food blogger and pro photographer Karen Ard of FarmToTableLA.com for the amazing photos in this post.

Photo: Karen Ard/FarmToTableLA.com


print recipe

Blueberry Not Ketchup lamb chops
Seared lamb chops take a bath in tangy Blueberry White Pepper Not Ketchup, then finish cooking in a hot oven. A quick, easy and elegant main course for your next family meal or dinner party.
Ingredients
  • 8 lamb loin or lamb rib chops
  • sea salt
  • freshly ground black pepper
  • 1 teaspoon grapeseed or canola oil
  • 1/2 cup Blueberry White Pepper Not Ketchup, plus more for serving
  • 2 Tablespoons fresh parsley, chopped
Instructions
Preheat the oven to 350 degrees F.Heat a large ovenproof skillet over med-high heat until very hot. Season both sides of lamb chops generously with salt and pepper.Add the oil to the hot skillet and add the lamb chops, with space between. Brown without disturbing for 4 minutes. Turn and brown the other side for 4 more minutes.Remove the skillet from the heat. Using the back of a spoon or a pastry brush, liberally coat the chops with Blueberry White Pepper Not Ketchup. Place the skillet in the oven and roast for 15 minutes. The chops should be cooked through but still slightly pink inside. Note: Lamb rib chops will probably take less time depending on how thickly they're cut, so use your judgment.To serve, remove the chops to a serving plate, spoon a little more Blueberry White Pepper Not Ketchup over each chop, and sprinkle with chopped parsley. Serve immediately.
Details
Prep time: Cook time: Total time: Yield: 4 servings

Tuesday, March 18, 2014

Sausage sauerkraut pancakes with Jimmy Dean Sausage Crumbles

  • Pin It

Disclosure: This post is sponsored by Jimmy Dean, and I am being compensated for creating this recipe. The sauerkraut obsession, however, is mine - for now. I'm warning you, the combination of sausage and sauerkraut may be contagious and highly addictive.

I am obsessed with making sauerkraut.

Do you know how easy it is to make homemade sauerkraut? Cabbage. Salt. Pressure. Time. That's it.

Whether homemade or store-bought, sauerkraut is good, and, many believe, good for you. Google "health benefits fermented foods" and you'll see a long list of articles suggesting that eating naturally fermented foods like pickles and sauerkraut help the digestive and immune systems. (Take a look at this method if you're interested in making your own, although store-bought works perfectly well in this recipe.)

When the nice people at Jimmy Dean asked if I'd be interested in trying their new Sausage Crumbles, my mind went immediately to the perfect combination: sausage and sauerkraut. The spices in the sausage play off the acidic tang of the fermented cabbage. (Think of sauerkraut on a hot dog or a grilled link sausage.)

I've always loved savory pancakes and was inspired by a picture of sauerkraut pancakes from Bon Appetit. I chose Jimmy Dean's Hearty Turkey Sausage Crumbles for this recipe, but you could easily use their other varieties: Hearty Original Sausage Crumbles or Hearty Hot & Spicy Sausage Crumbles. They're sold in the refrigerated section of major supermarkets and I found them extremely flavorful and easy to use - you get to skip the extra step of browning the meat, and there's no messy fat to drain.

Serve these sausage sauerkraut pancakes as a light lunch or dinner. I ate them for breakfast, but that's me. Oh, and that sauce drizzled on top? Cherry Chipotle Not Ketchup, one of my new fruit ketchups, of course. Not too sweet, a little spicy, lots of tang - it matched the flavors of the sausage and sauerkraut perfectly.


print recipe

Sausage Sauerkraut Pancakes
Savory pancakes studded with chunks of Jimmy Dean fully cooked Hearty Turkey Sausage Crumbles and loaded with tangy fermented sauerkraut. Making your own sauerkraut is easy, but store-bought sauerkraut works fine in this recipe.
Ingredients
  • 2 cups sauerkraut, liquid drained, tightly packed before measuring (homemade or jarred)
  • 2 eggs
  • 1 cup all-purpose baking mix (I use Bisquick)
  • 1/4 cup milk
  • 1 bag Jimmy Dean Hearty Turkey Sausage Crumbles (9.6 ounces)
  • freshly ground black pepper
  • 4 Tablespoons grapeseed or canola oil, for frying (use more as needed)
  • Cherry Chipotle Not Ketchup, for serving
Instructions
Put the sauerkraut in a strainer and rinse with cold water. Let drain, then squeeze the sauerkraut to get out as much of the excess liquid as possible. To a large bowl, add the sauerkraut and eggs. Whisk lightly with a fork to break up the eggs. Add the baking mix and milk and mix again until everything is combined. Stir in the Jimmy Dean Hearty Turkey Sausage Crumbles, then season the mixture generously with freshly ground black pepper.Heat a large nonstick skillet over medium-high heat. Add 1 Tablespoon of oil, then spoon 4 pancakes into the skillet, using about 3 Tablespoons of batter for each pancake. Cook until golden brown, then turn the pancakes and cook until golden brown on the second side. Remove the cooked pancakes to a plate, or to a rack set over a sheet pan. Repeat with the remaining oil and pancake batter until all the pancakes are made.Serve warm with Cherry Chipotle Not Ketchup.
Details
Prep time: Cook time: Total time: Yield: about 16 4-inch pancakes
#spon: I'm required to disclose a relationship between our site and Jimmy Dean. This could include Jimmy Dean providing us with content, product, access or other forms of payment.

Monday, March 10, 2014

Cherry Chipotle Not Ketchup tofu steaks

  • Pin It

The men in my household probably could live on meat alone. But sometimes I need a lighter option and a meat-free meal. They go out for burgers. I eat tofu.

I love a good tofu steak. Searing the tofu gets it crispy on the outside, but the interior stays nice and creamy. But you still need some flavor - which is where the Cherry Chipotle Not Ketchup came in. Sweet, tangy and just a little spicy, the Not Ketchup proved the perfect sauce for my seared tofu steaks.

Serve these with brown rice, farro, quinoa, or another healthy grain for a hearty, delicious vegetarian meal.

Want to know more about Not Ketchup, my new line of gourmet fruit ketchups? Click here


print recipe

Cherry Chipotle Not Ketchup Tofu Steaks
Seared tofu steaks take a bath in Cherry Chipotle Not Ketchup in this sweet, tangy, slightly spicy vegetarian entree. Don't worry about the exact size of your tofu blocks - as long as they're the right thickness, it doesn't matter how big they are.
Ingredients
Instructions
Preheat the oven to 375 degrees.Cut the tofu in half horizontally, so you have 4 pieces, each of which is approximately 4"x4"x1". Put several layers of paper towels on a cutting board and lay the tofu squares on top in a single layer. Cover with more paper towels, then put a sheet pan or another cutting board on top. Weight down the top of the pile with a large can of tomatoes or beans. (This will help draw some of the extra water out of the tofu.) Leave to drain for 30 minutes, or up to 2 hours.Heat an ovenproof skillet over medium heat. Add the oil, then lay the tofu steaks in the pan. Cook without moving the tofu for about 2 minutes, until the underside is golden brown and crusty.Flip the tofu steaks and pour over the Cherry Chipotle Not Ketchup, spreading the Not Ketchup with the back of a spoon so the tofu steaks are completely covered. Put the skillet in the oven and bake 15 minutes.Remove the tofu steaks from the oven. Serve hot with additional Cherry Chipotle Not Ketchup if desired.
Details
Prep time: Cook time: Total time: Yield: 2 servings