When we left off yesterday in the description of my early morning cake decorating lesson with Clemence Gossett of Gourmandise Desserts, all the pieces were ready to go: cakes split into layers, Swiss buttercream whipped, ganache filling light and fluffy.
The next thing we did was clear the counter and turntable of crumbs. Crumbs, says Clemence, are the enemy of icing. We spread the whipped chocolate ganache between the layers, leaving a wide rim so the chocolate wouldn't ooze out the sides when the layers were put together and pressed down.
Spreading the whipped chocolate ganache on the cake layers
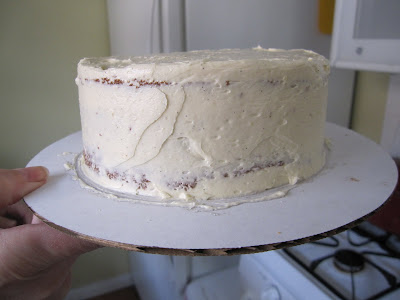
We started the crumb coat, the thin layer of buttercream that provides a smooth foundation for the fondant, by slapping a big dollop of buttercream on top of the cake, then working it down and around the sides. Start with more frosting than you think you need, counsels Clemence; it's easier to take away the extra than to work with too little, which will tear the cake.
Top, putting on the first crumb coat; bottom, the finished first crumb coat
The cake and its crumb coat went into the freezer to firm up. One problem I see with doing this in my own kitchen is that if you think I have room in my freezer for a cake on a turntable, you are sadly mistaken. My freezer is full of many delicious things, but it is indeed full. On a good day, maybe I'd be able to make room in the refrigerator. I'll have to think this through.
When the cake emerged about five minutes later, the crumb coat was stiff to the touch. We then put on a second crumb coat - not strictly necessary, but a nice-to-have if you really want the fondant to lie smoothly. Clemence showed me how to square up the top edge of the cake with buttercream so the fondant will drape well. Back into the freezer went the cake for another short stay.
Putting on the second crumb coat
While the cake was setting up in the freezer, Clemence took out the fondant, which I'd purchased at a nearby baking supply store. It looks like pure white Play-Doh. We sprinkled the counter with cornstarch and kneaded it a bit to soften it. Then Clemence put a drop of purple gel food coloring on half of it and kneaded it again to distribute the color - see that beautiful lilac color? Kindly, Clemence did all the food coloring work, as I had to head straight to the office and didn't think showing up with purple hands would make a great impression on my colleagues.
Top, adding color to half the fondant; bottom, rolling the fondant with cornstarch
We rolled out the fondant just the way you'd work with pie crust, turning it every now and again to make sure it wasn't sticking. The only difference is that you don't turn the fondant over, because you don't want the top to be covered in cornstarch. Then we picked up the rolled-out fondant on the rolling pin and draped it over the cake. Using our palms, we kind of cupped and smoothed the fondant along the sides of the cake, working out any pleats that wanted to form by nudging the icing this way and that. It doesn't sound like it would work, but it does, because the warmth of your hand shapes the fondant and helps it stretch and lie flat.
Top, using our palms to nudge the fondant into place; bottom, one cake covered with fondant
When the cake was well covered, we cut off the extra with a small sharp knife. Clemence cut some circles out of the scraps to use as decorations. She showed me how to mold a circle into the shape of a calla lily, with a tiny rolled-up log as the inside. I made two of the three lilies that ended up on top of the purple cake; I'm sure you can tell which was Clemence's and which were mine, but that's okay.
Top, fondant cut-outs; middle, shaping calla lilies; bottom, fondant flowers on the finished cake
For the other cake, Clemence got out her luster dust and mixed it with a little almond extract - it must be alcohol, and vodka is better because it's flavorless, but the almond scent was kind of nice, actually. She started painting on top of the cake in a doodly swirly way. This is where my lack of artistic skills really shows. I couldn't think of what to paint at all. So I followed the pattern she'd started, using both the pink and the gold, and I think it ended up looking very nice.
Tremendous thanks to Clemence for taking me under her wing. If you're in Los Angeles and have a few hours, sign up for one of her wonderful baking classes. Your friends and family will thank you.


2 comments:
thanks. learned a lot.
im sure it tasted great.....
Post a Comment